Friday, February 10, 2012


Monday, February 6, 2012
Resin Casting
I wanted to show the resin castings I did Saturday night. I used the Easycast resin again and I used this to "tint" it. I thought it would be more of a pearl/opal, but it turned out to be just a clear glitter. It would look great with a color.

Here is a shot of what I made and the molds I used. Like I said in the previous post, I get my molds from MoldMuse by Silicone Molds on Etsy.
There are lots of great molds. I really love MoldMuse because she typically has multi-imprint molds, but I plan to buy some from other shops to check them out. And there are certain shapes I want that I have found in other shops. Just search "silicone molds" under supplies and you'll find lots. =)
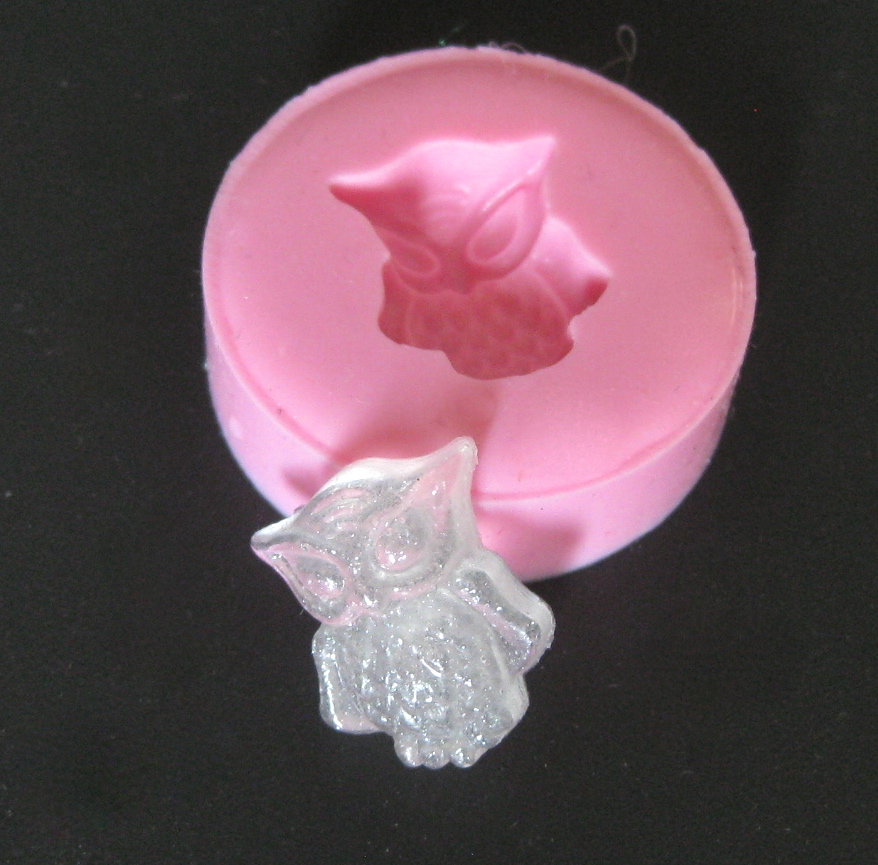
A close-up of my little hoot mold. It's hard to see the glitter, but it's there I promise. =)

Here is the pigment I used for this set. About 8 or so drops. I wanted it to be super glittery. With the color pigments, you only need to start with one drop. In my previous post, the red ones were done with one drop. They were still a little transparent. Next time, I'll do three or so.
Saturday, February 4, 2012
Tutorial: Tinting Sculpey Clay
A few months ago I got REALLY into silicone molds because I wanted to be able to make my own little flower decorations for clips. I started with what was available to me. My mom had some nude colored sculpey, so that's what we used. Well, we thought, "Oh, we will just paint them afterward."....bad idea. It's too much work. Then I discovered the clear epoxy resin and just tried that the other day. SO great. I use the Easycast brand. I love it. I bought their dyes too but I'm going to try using acrylic paint. Fun! Here is my first attempt with the resin.

Tip: Don't use the clay on the more intricate molds like the fleur de lis. WAY hard to press it in. I mean, it's doable, but hard.
Tip: Get lots of molds. This stuff has to dry for many hours and even then it's not really hard. Anyway, you can take them out after about 12 or so hours, but it would be nice to be able to pour lots at one time. I made like an ounce of resin and I still had some left over. You don't want to waste it.
So then I got to thinking...there has to be a way to dye the sculpey. I googled it and voila! There's a way. So here it is. =)

This is what I used. It is a nude color.

Get a little amount and work it into a "patty."

Take a sharpie and dot it all over the top. I did dots because dragging it just made the clay stick to the tip. You get a lot more ink out by dotting.

Fold it over and flatten it out again. Repeat the dotting.

Keep folding it over and you start to get the marbled effect.

Mix it all up and once you get the color you want, you're finished!

These are the colors I made and the sharpies I used to make them.

Here are all of the totally fun cabochons I made with my tinted clay! I hope you will try it and have as much fun as I did.
P.S. You bake the clay according to the box and I baked mine IN the molds! This keeps them from getting distorted because they are hard when you get them out of the oven.
=) I get my molds from MoldMuse by Silicone Molds on Etsy
Friday, February 3, 2012
Sweet P
My sweet friend Staci had her baby girl on January 9th and she is absolutely precious! Staci had purchased lots of bows and headbands from me several months back. It was so exciting to see her wearing two of them in her newborn photos!
I really need to streamline my shop and had decided to give up on the baby headbands. But, seeing them modeled by such an angel makes me want to make tons! What do you think? Maybe I'll do a post about the items I make and have a little feedback about which items you guys think I should cut and which I should continue.
Here's my Sweet P!


Wednesday, February 1, 2012
Chevron Board - DIY
I just finished a really fun project! I have loved the look of chevrons for quite some time and just got around to incorporating them into my home. Here is my project and how you can do it yourself. =)
First I had my dad cut out a piece of plywood 5' by 20". That is the size I needed for the space I wanted it for. You could do any size. I white-washed it with white acrylic paint. Basically I painted it on and wiped it off with a wet rag as I went. I don't know if that's the "official" method, but it worked.
I got the chevron pattern here. I printed out four copies and taped them together.
Next I layed the pattern on the board and scored it with an embossing tool. I had to be very careful to line the pattern up right each time. It took forever and my arm was really sore from the scoring.

Then I had to tape all of those lines perfectly with painter's tape. My back is still hurting from all of the leaning over. =I

After I got all the tape on and pressed smooth, I spray painted it with grey paint. Spray paint works better than brushing on acrylic because it doesn't bleed as much and goes way faster.

Once the paint was dry, which wasn't long (another great plus for spray paint), I peeled off all the tape.

Then I painted a letter B I had on hand. I chose a golden buttercup color because I love grey and gold together. After that dried I used wood glue to adhere it to the bottom right corner of the board. I used clamps and a heavy canister of Rehydrate to weigh it down. haha

My husband attached picture loops and picture wire to the back to hang it. Here is the finished product! We love it!!

Friday, November 18, 2011


Thursday, November 17, 2011
How To
Turn bunny ears into pig ears! haha, this was something I just randomly did for a coworker last week. She needed pig ears and all they had at the dollar store were bunny ears. My question is....why do they even have bunny ears right now? Weird. Anyway, she asked if I could transform them so I did! This is how I did it.

Here you have the regular bunny ears. I cut a slit in them and cut down the hard plastic that was inside to about the height of a pig ear.

Next, I folded the ear down and glued it to the headband.

I also glued the front of the ear to the back to secure it.

Last, I folded the ear flaps down and glued them. Not perfect pig ears, but good enough for a last minute bunny to pig transformation!
Sunday, November 6, 2011


Thursday, September 29, 2011
Cowtown Indie Bazaar

Come see Fanciful Felt at the Cowtown Indie Bazaar next month! My mom and I will be running my booth and we are so excited!!
Details are over there ---->
Here is a link to the artists who will be at the Bazaar.
Thursday, September 1, 2011
Try Harder
Whenever you approach someone with a problem or issue you never want them to make excuses right? Let's get real...everyone hates excuses. All you're really looking for is a simple "I will try harder" or something to that effect. Well, I am approaching myself with a problem - "Kristen, you need to keep up with your blogs better and post things with actual meaning and depth." To this I reply, "OK self, I will try harder."
----------------------------------
Deep, meaningful post #1 - sharing the deep, meaningful thoughts of others. LOL
So here it is. You should read it...especially if you are a handmade artist yourself.
http://whatthecraft.com/overpriced-cant-afford-handmade-pricing/
-----Side Note, I LOVE the top she uses as a demo in the article. I would TOTALLY wear that! Maybe one day I'll take up sewing and see if I can whip out a top for myself. One day when I have free time....haha yeah right.
Subscribe to:
Posts (Atom)