I just finished a really fun project! I have loved the look of chevrons for quite some time and just got around to incorporating them into my home. Here is my project and how you can do it yourself. =)
First I had my dad cut out a piece of plywood 5' by 20". That is the size I needed for the space I wanted it for. You could do any size. I white-washed it with white acrylic paint. Basically I painted it on and wiped it off with a wet rag as I went. I don't know if that's the "official" method, but it worked.
I got the chevron pattern here. I printed out four copies and taped them together.
Next I layed the pattern on the board and scored it with an embossing tool. I had to be very careful to line the pattern up right each time. It took forever and my arm was really sore from the scoring.
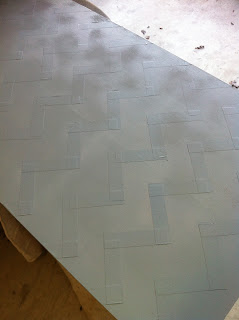
Then I had to tape all of those lines perfectly with painter's tape. My back is still hurting from all of the leaning over. =I
After I got all the tape on and pressed smooth, I spray painted it with grey paint. Spray paint works better than brushing on acrylic because it doesn't bleed as much and goes way faster.
Once the paint was dry, which wasn't long (another great plus for spray paint), I peeled off all the tape.
Then I painted a letter B I had on hand. I chose a golden buttercup color because I love grey and gold together. After that dried I used wood glue to adhere it to the bottom right corner of the board. I used clamps and a heavy canister of Rehydrate to weigh it down. haha
My husband attached picture loops and picture wire to the back to hang it. Here is the finished product! We love it!!


2 comments:
Super cute! I feel some projects coming on for our new house! Heather
I had been so busy making things for other people that I hadn't done anything for us in so long. I was ready!! I'd love to see what you do! =)
Post a Comment