I had these AWESOME silhouettes made of my babes a few months ago and finally got the perfect frames for them. They are now hanging in our living room. LOVE the way they look. Lindsey is amazing. She is such a talented lady in many areas. Check out her blog Out of Alabaster. You can purchase your very own custom silhouettes from her Etsy store. I highly recommend it. =)
Here is my wall where I hung the portraits. It's a work in progress. I need to visit some antique shops.
Thursday, July 5, 2012
Sunday, June 24, 2012
First Birthday
My little one is turning ONE on Wednesday! =) I can't believe it! Time has gone by so quickly. I did a monster theme for his party yesterday. Thank you Pinterest for inspiring me!
Tissue Poms with Monster eyes and teeth. I followed this video on YouTube
Fun chevron and green paper/ribbon banner with my baby's name. =) I used the Creative Memories circle cutter. That link will take you to the page with all the custom shape cutting tools.
Monster Marshmallow Pops with icing and dyed coconut hair. I used food markers to do the faces. My friend and I dyed the coconut with food coloring in zipper bags. SO easy.
The blocks are foam floral arranging blocks from Hobby Lobby and my cousin helped by covering them with wrapping paper, also from Hobby Lobby.
I made his smash cake and did the mouth/teeth with a homemade cardstock stencil and cocoa/powdered sugar. His eyes are a jumbo marshmallow cut in half
I made the monster favors with fleece and felt and my mom helped me stitch them together to save time. =)
All of the monster clip art I used for the labels was purchased on Etsy at Peach Pops Clipart.
Monster cupcakes: Strawberry cake, cream cheese icing, dyed coconut hair, marshmallow eyes and pretzel horns! =) They were a big hit!
Monday, June 4, 2012
Coming Soon: A Bridal Shop
I made a decorative wedding sash for a dear friend of mine. She is very trusting of me to ask me to make something I've never made before... and it turned out great!
I'm seriously considering opening a bridal shop on Etsy. Thoughts?
I'm seriously considering opening a bridal shop on Etsy. Thoughts?
Wednesday, May 23, 2012
Teacher Appreciation
I made these for some special teachers this month. =)
I just put a package of microwave popcorn and a soda. You could also add a package of gum and several other "poppy" things. =)
I just put a package of microwave popcorn and a soda. You could also add a package of gum and several other "poppy" things. =)
Wednesday, May 2, 2012
I got a very exciting message from a customer last night. She told me her school was featured on The Today Show and they interviewed the Superintendent right in front of her classroom. The pencil sign I painted for her was hanging on the wall in the background! Crazy! My sign is famous. Ipso facto....I'm famous. haha My husband and I were FLIPPING out when I got the message. We ran downstairs to watch it on the real computer. So exciting!
Of course, I can't find a picture of her sign....I think it's the ONE sign I forgot to photograph before sending it off. Lame. Here's a screen shot of the video. Haha
The story is really cool. Watch the video! http://video.today.msnbc.msn.com/today/47244686#47244686
Oh and here is an example of the sign in the video. Not THE sign =( , but one like it.
Monday, April 23, 2012
The Washing Machine is Your Friend
Somehow I developed this fear of putting things in the washing machine. If it's not sturdy clothing, you can't wash it in there!! If it says "spot clean only," you CAN'T wash it in there!!!!!!! Well, I have come to realize that this is a lie. It all started about a year ago with T's teddy bear, pancakes. He desperately needed a bath after being chewed and slobbered on. My first thought is, hand-wash....ugh. That can be way more difficult than it sounds. So, I decided to just go for it. Pancakes was taking a ride in the spinny bath. It was either that or he didn't get to play with T anymore. I figured I'd take my chances.
And what do you know?! He came out just fine. He actually looked brand new afterward! Why fret so much about a silly bear you ask? Well, my sister gave him this bear and her husband named him the perfect name of Pancakes. And T just loves him so much. He still sleeps with him every night and laughs when Pancakes dive-bombs him at bed time. =) Even mom got a little Pancakes-obsessed....so much so that I ordered his brother Flapjack off Ebay for baby brother J!
He's a puppy....so they're step-brothers, ok? And I even got a little pink bunny for their future sister...haha I'm not pregnant! But I just had to snatch her up. Check these guys out on Ebay...they are going for a pretty penny! They're from Pottery Barn, btw.
So Joseph's bag got carrot-stained from a jar of carrots that broke inside of it. I was back at square 1, not trusting the washing machine. I soaked it in a bucket with soap and oxi-clean....awful. It had dyes running down it and soap crusted all over it. I decided enough was enough, this thing is going in the washing machine. I threw in two vinyl bibs of T's and they all came out looking brand-new! I love you, washing machine!!
Longest post ever.
Tuesday, April 17, 2012
The Salt Tree
I just discovered an Etsy store with some GREAT wreaths! The Salt Tree. If you're looking for a ready-made wreath for your home, look no further. =)
I think this one is my favorite:
I think this one is my favorite:
Tuesday, April 3, 2012
Tuesday, March 27, 2012
Halloween Yet?
I REALLY love fall, especially Halloween. I mostly just love the colors though. =)
Aaaand I finally made the bow organizer I've been meaning to make forEVER! I've had this frame since High School. The mirror broke out of it and I saved it. I knew I could do something with it. My first plan was to paint a square painting to go in it, but I kind of stopped painting. A year or two ago I realized it would make the most perfect bow organizer! Now I can finally clip up all of the bows I make for my shop. I may even use it at a bazaar. So, here it is. =)
Saturday, March 17, 2012
Tuesday, February 28, 2012
Red Clay
Well, I discovered that it's virtually impossible to turn the skin colored clay red with a sharpie. No matter how much red I added it still looked orange. Oh well! It's a great orange! I ordered a huge sampling of different colored Sculpey clay on Etsy. I can't WAIT to use it. =)

Wednesday, February 22, 2012
Tuesday, February 21, 2012
Friday, February 10, 2012
Monday, February 6, 2012
Resin Casting
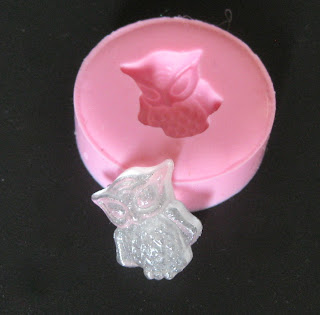
I wanted to show the resin castings I did Saturday night. I used the Easycast resin again and I used this to "tint" it. I thought it would be more of a pearl/opal, but it turned out to be just a clear glitter. It would look great with a color.

Here is a shot of what I made and the molds I used. Like I said in the previous post, I get my molds from MoldMuse by Silicone Molds on Etsy.
There are lots of great molds. I really love MoldMuse because she typically has multi-imprint molds, but I plan to buy some from other shops to check them out. And there are certain shapes I want that I have found in other shops. Just search "silicone molds" under supplies and you'll find lots. =)
A close-up of my little hoot mold. It's hard to see the glitter, but it's there I promise. =)
Here is the pigment I used for this set. About 8 or so drops. I wanted it to be super glittery. With the color pigments, you only need to start with one drop. In my previous post, the red ones were done with one drop. They were still a little transparent. Next time, I'll do three or so.
Saturday, February 4, 2012
Tutorial: Tinting Sculpey Clay
A few months ago I got REALLY into silicone molds because I wanted to be able to make my own little flower decorations for clips. I started with what was available to me. My mom had some nude colored sculpey, so that's what we used. Well, we thought, "Oh, we will just paint them afterward."....bad idea. It's too much work. Then I discovered the clear epoxy resin and just tried that the other day. SO great. I use the Easycast brand. I love it. I bought their dyes too but I'm going to try using acrylic paint. Fun! Here is my first attempt with the resin.

Tip: Don't use the clay on the more intricate molds like the fleur de lis. WAY hard to press it in. I mean, it's doable, but hard.
Tip: Get lots of molds. This stuff has to dry for many hours and even then it's not really hard. Anyway, you can take them out after about 12 or so hours, but it would be nice to be able to pour lots at one time. I made like an ounce of resin and I still had some left over. You don't want to waste it.
So then I got to thinking...there has to be a way to dye the sculpey. I googled it and voila! There's a way. So here it is. =)
This is what I used. It is a nude color.
Get a little amount and work it into a "patty."
Take a sharpie and dot it all over the top. I did dots because dragging it just made the clay stick to the tip. You get a lot more ink out by dotting.
Fold it over and flatten it out again. Repeat the dotting.
Keep folding it over and you start to get the marbled effect.
Mix it all up and once you get the color you want, you're finished!
These are the colors I made and the sharpies I used to make them.
Here are all of the totally fun cabochons I made with my tinted clay! I hope you will try it and have as much fun as I did.
P.S. You bake the clay according to the box and I baked mine IN the molds! This keeps them from getting distorted because they are hard when you get them out of the oven.
=) I get my molds from MoldMuse by Silicone Molds on Etsy
Friday, February 3, 2012
Sweet P
My sweet friend Staci had her baby girl on January 9th and she is absolutely precious! Staci had purchased lots of bows and headbands from me several months back. It was so exciting to see her wearing two of them in her newborn photos!
I really need to streamline my shop and had decided to give up on the baby headbands. But, seeing them modeled by such an angel makes me want to make tons! What do you think? Maybe I'll do a post about the items I make and have a little feedback about which items you guys think I should cut and which I should continue.
Here's my Sweet P!
Wednesday, February 1, 2012
Chevron Board - DIY
I just finished a really fun project! I have loved the look of chevrons for quite some time and just got around to incorporating them into my home. Here is my project and how you can do it yourself. =)
First I had my dad cut out a piece of plywood 5' by 20". That is the size I needed for the space I wanted it for. You could do any size. I white-washed it with white acrylic paint. Basically I painted it on and wiped it off with a wet rag as I went. I don't know if that's the "official" method, but it worked.
I got the chevron pattern here. I printed out four copies and taped them together.
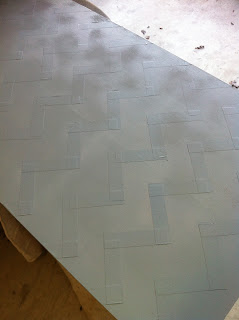
Next I layed the pattern on the board and scored it with an embossing tool. I had to be very careful to line the pattern up right each time. It took forever and my arm was really sore from the scoring.
Then I had to tape all of those lines perfectly with painter's tape. My back is still hurting from all of the leaning over. =I
After I got all the tape on and pressed smooth, I spray painted it with grey paint. Spray paint works better than brushing on acrylic because it doesn't bleed as much and goes way faster.
Once the paint was dry, which wasn't long (another great plus for spray paint), I peeled off all the tape.
Then I painted a letter B I had on hand. I chose a golden buttercup color because I love grey and gold together. After that dried I used wood glue to adhere it to the bottom right corner of the board. I used clamps and a heavy canister of Rehydrate to weigh it down. haha
My husband attached picture loops and picture wire to the back to hang it. Here is the finished product! We love it!!
Subscribe to:
Comments (Atom)


